Dryer Fix pt2 -20171102
Ok, as mentioned in the last post, my dryer died and I found out that the problem was a faulty thermal fuse. Replacement fuses seem to not be made to spec, so that forces me to make my own fix.
Now, let me reiterate, the dryer will still dry if the thermal fuse is shorted, but that doesn’t sound very safe. For right now, I don’t leave the dryer running when I leave the house, just in case!
I made up the requirements in the last post, but in this post; I’d like to walk everyone through the real meat and potatoes of engineering: problem solving! Specifically, the brainstorming, or sketching portion of the design process. This is not the detailed design, where math, simulations, and CAD work is performed. No, this is the part where you size-up the problem and start thinking about ways to tackle it.
This is also the part that is hardest to teach, since most of the solutions that you create, are based on past experience and past designs. Knowing what is out there, and all the possible ways to solve a problem, is half the battle.
Ok, so let’s get started. We need to measure temperature, and specifically very high temperatures. This rules out a lot of different measurement devices. I really like the IC temperature measurement devices, like the LM35. That, in fact, is my go-to device for simple temperature measurements. Again, this is one of those situations that you wouldn’t know to use the LM35 for this application, if you didn’t know that the LM35 existed! Yeah, this is where experience comes in handy.
Unfortunately for the LM35, its max temperature is right at our setpoint of 150⁰C. So that’s out.
Next, on the list: thermistors. These are nice devices whose resistance changes with respect to temperature changes. They come in two flavors: NTC which get more resistive as temperature goes down and PTC, which does the opposite and gets more resistive as temperature goes up. You can go check out Wikipedia to find out more about them if you’d like.
Thermistors have two problems for our application. One; they don’t have the highest temperature range, and two; they don’t behave very linearly over large temperature ranges.
We could go through a bunch of different ICs that measure temperature, but I’m going to go wager that they can’t measure temperatures above 150⁰C. Guess what does have a large temperature range that we require? Thermocouples, just like the one we did the tests with in the last post!
Thermocouples have complicated readout circuits (more than LM35s or thermistors) but like most things today, there might be an IC that handles all of that for us. Guess what, doing a little bit of searching on DigiKey (more about them in a different post) I found an IC from Analog Devices that does just that.
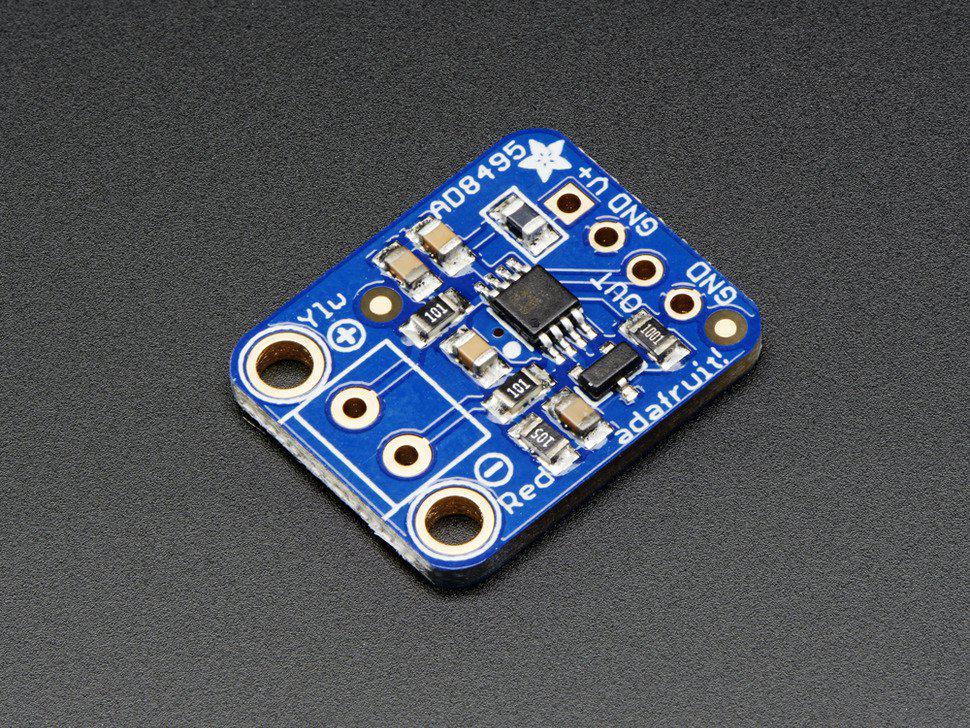
The AD8495 is just what the doctor ordered. It amplifies K-type thermocouples, can take a low input voltage, and produces a linear output of 5mV/⁰C. To make things even better, there is a small dev board from Ada Fruit. If you have never checked out Ada Fruit, they specialize in helping the hobbyist and maker community with electronics and have a number of dev boards for small and simple ICs.

Figure 1. The AD8495 dev board. From Adafruit.com
In a nutshell, the AD8495 will readout our thermocouple and convert its readings into an analog voltage that is proportional to the temperature. The actual transfer function is In degrees C.
Now that we have a voltage, we have two paths that we can go down: Digitize the voltage and feed it into a micro controller, or use a series of analog ICs to process something useful. There is no correct way to go. Either digital or analog would work for our application. On one hand, digital is simpler to design, and the code to do all of this processing is simple, but we would need several expensive parts, support systems for a micro controller (special power, ADCs, programming, etc.) and in many ways, going the digital route would be overkill for this type of job.
No, I think this is a job for good old analog circuits. Today, analog can scare people away, and there are a lot of “devil in the details” moments when doing things in analog, but this application should not be one of those.
So, we need to turn the heater in the dryer off when the temperature gets too hot. That sounds like a job for a switch of some type. Well, we could do something with a power MOSFET, but in this situation, again, simpler is better. Let’s use a relay! Not as sexy as a MOSFET, relays are dumb and easy to use switches. And for high power applications like this, they are the best way to go.
We need first figure out how much current will be flowing through this relay, since I’m guessing that will be the deciding factor on which relay we should use. According to the power rating on the heating unit, the dryer uses 5400W! At 240VAC that is equates to 22.5A. Just to be safe, I’m going to add a 20% safety factor. That bumps the current to 27A.
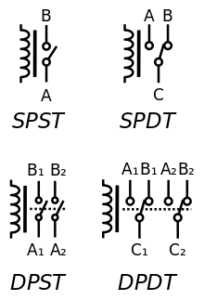
In addition to current, we need to figure out which Contact Form we need. This is the actual switching logic. There are many different types, but all of them are described by two numbers: Posts and Throws. A post is a “direction” the relay can go in. Double post would have two options: something like “right” and “left”. Triple pole would add a third direction. Single pole relays are like double post relays with only one real option, with the second direction being “not connected.” This is actually what we want. Either our relay is connected to allow current to flow, or not connected to anything.
The number of throws dictates how many paths are connected when the relay is on. We only need one for our application. The last bit of information we need for a single post, single throw (SPST) is the default or unpowered, condition. Without power applied, is the relay closed, or open? Since the safe situation for our dryer is to turn the heater off, we should use that as our default position. For example, what happens if the circuit that controls the relay loses power? We would want the safe, open situation to occur. This “normally open” relay is label as a “NO” relay. The opposite would be normally closed or NC.

Figure 2: Different Relay Types, courtesy of Wikipeadia.org
In relay or switch nomenclature, a SPST, NO relay is known as a “1 form A” relay.
Next time we will look at connecting the relay and the thermocouple circuit together with some logic.